

That's the name of a wonderful free download that I found on my new favorite Blog/blog designer, Smitten Blog Designs Their work is absolutely gorgeous and I encourage you all to request a design from them! This morning I awoke extra early and did some very random web surfing. Sometimes I have web ADD and end up with fifteen or more internet tabs open all at once. This is not necessarily a bad thing. I don't believe that there's ever enough time to see everything that I want to see all at once, and I'm always discovering something new.
This morning I started out looking at fabric flowers, then moved on to an endless supply of new fabric, and then stumbled on Smitten. Smitten I was immediately indeed! There are tons of options for re-designing your blog or website and they have some of the most adorable and eye catching templates!

I recognized one of the blogs I already follow on blogger in their client list called "Living with Punks". Susan, the creator, always has the BEST tutorials and links to everything crafty and I love it all!!!
So, back to my story.....see A.D.D. again :)!! I'm on Smitten, and at the top there's a link for "freebies". Crafters are always on the lookout for something free, and a way to share with others....so here's the link:
smittenblogdesigns
Its full of awesome downloads for FREE, and immediately the hello sunshine gift tags popped out at me.
I knew it'd be perfect to use for hang tags on my dresses at the Farmer's market and I'd had exactly such a design in mind for a few weeks now and so.......I whipped out my cardstock, fired up my printer, and uploaded the labels to my gimp software---another FREE photo editing program that is much like photoshop.....only FREE! ...Noticing a pattern here? Yep, you guessed it....I'm thrifty!
http://sourceforge.net/projects/gimp-win/files/GIMP%20%2B%20GTK%2B%20%28stable%20release%29/GIMP%202.6.11%20%2B%20GTK%2B%202.16.6/gimp-2.6.11-i686-setup-1.exe/download
Here's a link to the website where you can download your own Gimp software...........for FREE!!!
Gimp isn't so easy at first if you're not familiar with everything---which I totally was NOT when I first downloaded it. I found some great tutorials by searching google and I believe they were on youtube, but I can't remember now......so.....I'm making my OWN tutorial for you.
I'm going to go thru everything from the beginning step by step the way that I do it, which may or may not be the best/fastest/easiest. But it is the way that I do it and keep my sanity and I'll try to explain as simply as I can for all those that are as technically inclined as I am not. Think of this as my own version of "Gimp for Dummies" Written by a "Dummy", for all you other "Dummies" out there!! This is my first tutorial, so I definately qualify as a dummy :p
Beginners Gimp tutorial for a basic gift tag/label personalization

Now you're going to open GIMP up. I put it on my start menu, so it’s there when I click on start without searching all my computer programs....which is difficult for me.

 You'll see this pic of a fox that looks like this to let you know its opening Then, you'll see a window that says "GIMP" at the top with some foreign objects/buttons that you may have never seen before. We'll call this the "tool menu" from here out to keep things clear...
 I was lost as to what to do here my first time because as you can see there's no "workspace". That's what you have to create and customize yourself and I'll show you how....bear with me, once you learn it gets easier...
At the top left corner of that gimp tool window is you'll see: "File Xtns Help"
I want you to now left click on "file" and a drop down menu will appear. The first one on the list is "new" and I want you to left click on that.

Now, you'll see this window. It says "create a new image in the top left, and it has a pull down menu for a template, which is a list of standard sizes for things like letters and web banners and even something called toilet paper.....I'm sure it doesn't mean the white stuff that’s in your bathroom....but I'm not positive :P
 I want you to click on the arrow on the right side of the white space beside template and scroll down to the one that says US-Legal (300ppi) ...which is funnily enough just above toilet paper.....if any of you know what in the world they really mean please share! I haven't explored that yet!!
Now, press "OK" at the bottom, which will be highlighted in blue after you've selected your template. You'll now have a window that looks like this:

 Notice at the top it says RGB,1 layer in parenthesis. This means that you haven't added anything other than a blank page that is the size 2550x4200......that is the size of a standard piece of printing paper. From now on, I'll call this the workspace page.
 You now have two Gimp pages open, the first that says GIMP at the top, the other that says Untitled. GIMP is your toolbox, and untitled is your workspace. Adjust the size of your windows in a way that you can see both at once like this if you're able: Now, I want you to click on "file" on your workspace side. Go down to your 3rd option, which is "open as layers". Click on it, and it will open up all the picture and document files on your computer. Locate the file you downloaded earlier for the "Hello Sunshine Gift Tags" Left click on it, and it will automatically open in your workspace window like this:
 Now, you need to resize the image so that it will fill up the whole sheet. Click on the toolbox window and find the tool that looks like a big square with a small square in the corner. It's called "scale"
This is the scale tool, and you need to left click on it. When you do, the menu at the bottom of the toolbox will change. Now, left click on your image and you'll get a 3rd window that looks like this one below:
 Ignore this menu for now and click on the image again. That menu will "disappear" for now....it went behind your pic.....and your pic is now highlighted with purple squares at the corners. You can drag these to resize your image how you want it.....make sure that the label part stays inside the white part of the original layer....imagine that it’s a pile of papers, and each image you add is a paper on top and that whatever is stacked on top of the bottom layer will be trimmed within the lines of the original. To see everything better you may need to maximize the workspace menu using the magnification icon in the toolbox window. When you get your image where you want it, go ahead and minimize the workspace window so that you can get to the menu for “Scale” that is under your workspace. Make sure that when you're done resizing you press "scale image" in order to save your work. This will also trim your enlarged pic down so that its now back inside your original layer.
 If you enlarged too much, just undo it by clicking on edit on the workspace window, and clicking on “undo scale”on the pull down menu, or "ctrl+z" on the keyboard in order to undo the last change. Now just go thru the steps until you get it the way you want… Switch to the “move” tool when you get it the right size which is on your tool box and looks like this on the right.
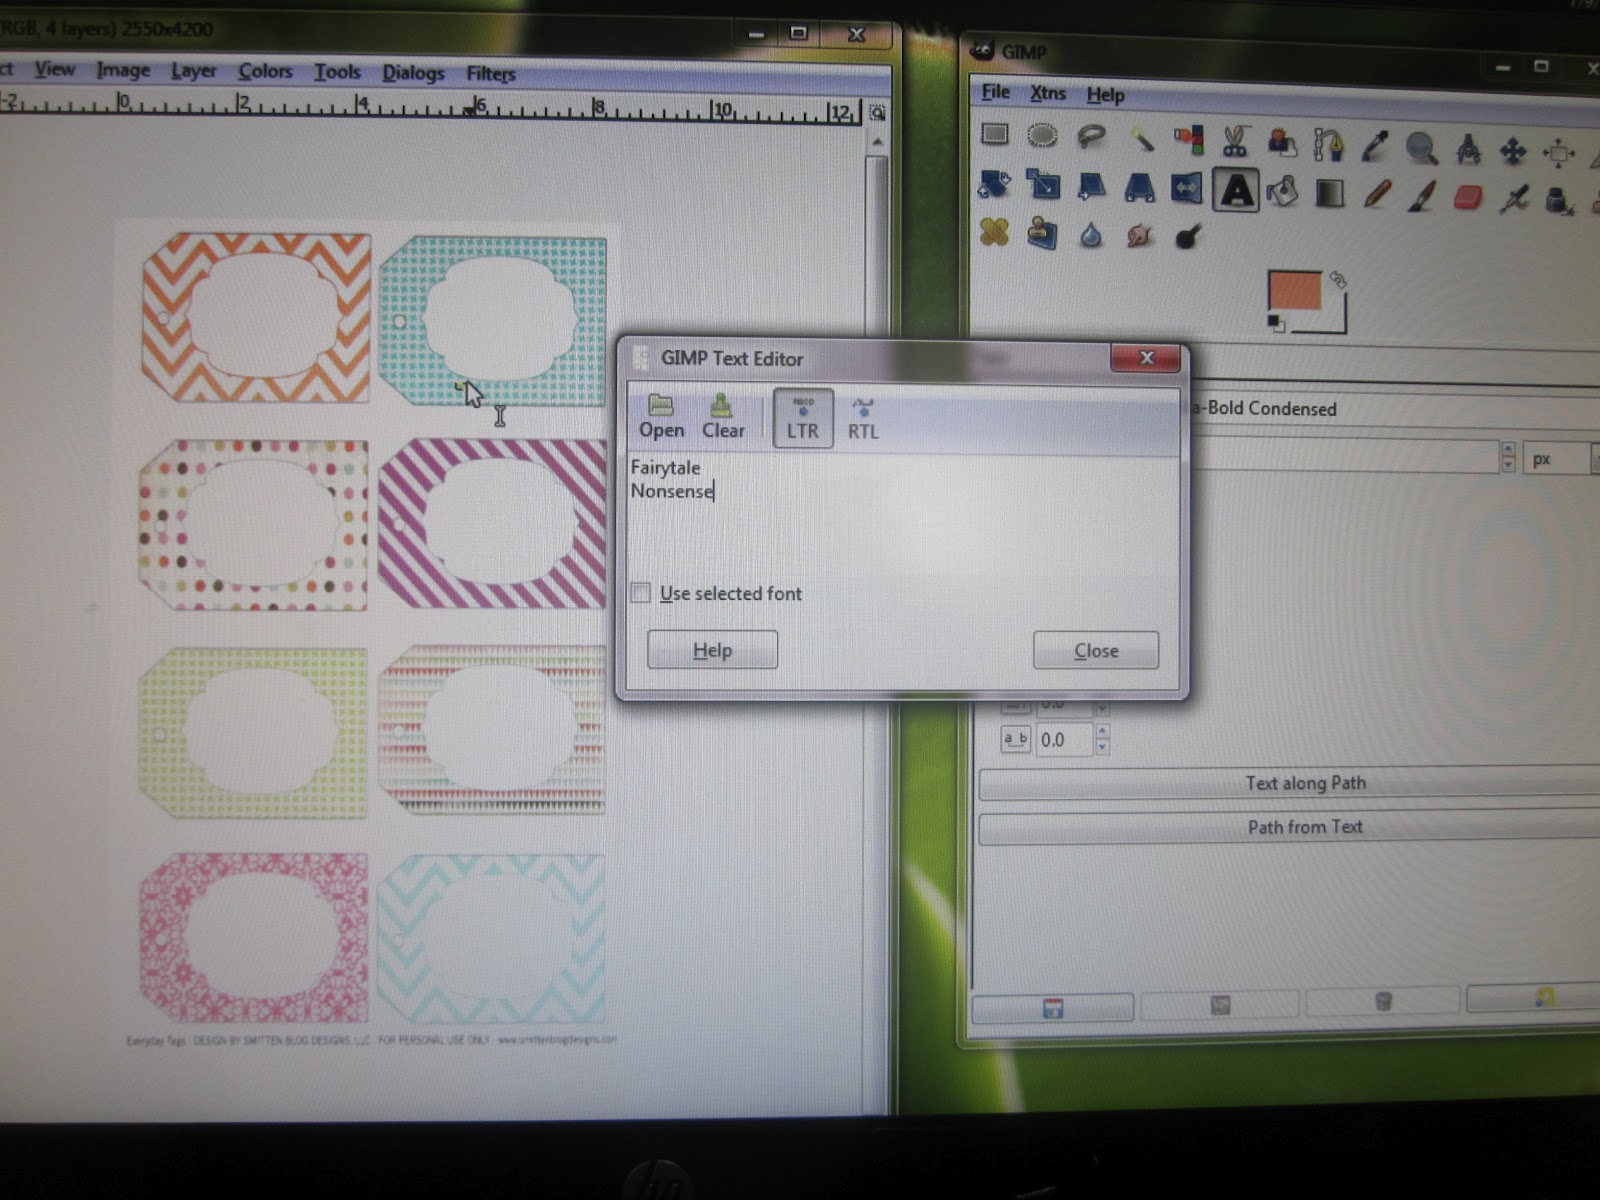
Now, enter your text by clicking on the big black A….it’ll open a text menu with a long list of fonts and color and size box that looks like this. You can play with this endlessly to find what you like best. For mine, I chose the text "Mensch ultra-bold condensed" for the words “fairytale nonsense” and used the color picker to get a complementary color for my tag from another. You can choose one and try it out then go back and undo and start over if you don’t like it….. When you choose a font and color, click on one of your tags and a new window will pop up for the text editor. Enter your text here and then click close. It will look like this:
Your text is now tiny; Now, you need to resize that text and move it. First, click on the move tool, the one that looks like a blue cross with arrows on the ends. Now you’ll see the move menu at the bottom of the toolbox window and it says pick a layer or guide or move the active layer.

Click on move the active layer or you’ll move the whole pic instead of the text!!
Now, move your text to the middle, then resize the text by clicking on the text menu on the toolbox again….and now click on your text so that it knows that you want to work with what’s there…..resize it using the size menu within the text submenu on the toolbox window, then be sure to click ok on the text widow where your text is so that your changes are saved, and then move your text if needed using the "move" tool on the toolbox. When you’ve got it just right, you’re ready to copy it to the other windows……
 RIGHT click on the text area in the workspace; it should be outlined and or highlighted. It may help you to zoom in or out. A sub-menu will open with several options with arrows beside them. If you hover over these, another menu will open. Go down to the one that says “layer” and hover over it. Another menu will appear beside it that says. Move your pointer over the option that says “duplicate layer” and click on it.
 You have now cloned your text exactly! You can’t tell because it’s perfectly placed on top of the old text so now you need to move it. Zoom out if you haven’t already ( the magnifying glass) Now that you can see your other tags, pick up the new top layer of duplicate text and place it on another tag it the same way the first one is…
Move the top duplicate to a new tag by using the move button on the toolbox…..the one that looks like a cross with arrows at the ends.

 Now, I added a text box with “Boutique” in it to all the tags in smaller letters and a different font. For mine, I chose “lavenderia” for the font.
Just copy and paste it to all the rest now, just like before…..you should be an old pro now and flying thru this
This is what it looked like…..then I printed it out, cut out the cards, and punched a hole in each one...I then took burlap and cut out rectangles about a half inch bigger all around and frayed the edges by hand so that they looked like this.


Be sure to press the burlap before attaching so that it all lies flat when you’re done!
 Finished off with a piece of waxed thin twine to go thru the punched hole, thru the burlap, and tied around in a bow to hold it all together. Be sure to tie the ends of the bow in a knot so that they can’t come loose!
And now you’ll have something that looks like this……FINALLY!
Insert pic of finished tags
That seemed harder than it was. . . I think that anyone can do this if they follow the instructions. I hope you all enjoy!
…and now my early morning turned into late AFTERNOON!!!
Ciao!
***special note about printing GIMP images……You will need to resave it as a .gif image….do this by clicking on “save AS” in the workspace window, choosing a name that will be easy for you to find, then clicking on the pull down arrow where it says “select file type (by extension)” and scrolling down and selecting “.gif”. It will then tell you that its “flattening” the image and merging all the layers together…..that means you can’t go back and change the layers and that it can then be resized and printed to whatever dimension s you want!
HAPPY CRAFTING EVERYONE!!!!

No comments:
Post a Comment
Thanks for your input! It's very much appreciated. Follow us on Facebook at: https://www.facebook.com/FairytaleNonsense or check out our Etsy shop at: http://www.etsy.com/shop/FairytaleNonsense
Fairytale Nonsense
Be daring, be different, be impractical, be anything that will assert integrity of purpose and imaginative vision against the play-it-safers, the creatures of the commonplace, the slaves of the ordinary.
Note: Only a member of this blog may post a comment.